
Have you considered selling on Amazon lately? Are you stuck on the Amazon Seller Account Registration process? Do you plan to start selling as a means to supplement your income? These are questions that many newbie sellers often ask. And to succeed in a marketplace as big as Amazon, it’s important to be proactive in finding answers to them.
As a new and aspiring seller, it’s valid to have these questions. But worry not! This guide is all you need to create and set up your Amazon business account in no time at all.
Table of Contents
Why should you sell on Amazon in 2024?
Amazon is the world’s largest online marketplace, with over 2.5 million active sellers from all over the world. There are also around 300 million registered users on the platform, with more than half of its Prime Members.
Here are some interesting statistics that make AMZN one of the most sought-after eCommerce platforms in the world:
- More than 300,000 third-party sellers started selling on the website in 2017.
- More than 140,000 third-party sellers made over $100,000 in annual sales.
- Approximately 2.5 million active sellers sell their products on the marketplace (as of 2019).
- It has over 300 million active users
- There are approximately 25,000 sellers making over $1 million worth of sales. Around 200,000 sellers are making over $100,000 worth of sales.
Selling on AMZ is certainly one of the most reliable ways to make money. You too can join thousands of others who are making money on the website. But first, how do you get started?
Starting an AMZ online store is straightforward. First of all, you have to create an Amazon seller account. Without this, it is almost impossible to start your business. So, we will teach you how to complete your registration. But before everything else, how does selling on the platform work in the first place?
Visit our Main Amazon FBA Post on Everything You Need to know to Start with Amazon FBA.
How does Amazon work?
Amazon is simply a bridge that connects third-party sellers like you to customers. When you decide to start selling on AMZ, you will have two fulfillment options to choose from:
- Fulfillment by Amazon (FBA)
- Fulfillment by Merchant (FBM)
With FBA, Amazon will fulfill your orders, handle shipping, and provide customer service for your business. On the other hand, if you choose the FBM (Fulfilled by Merchant option), you will have to personally handle all your business processes.
Using FBA is your best bet if you want to save time and outsource major processes to a professional team. The fulfillment model also gives you access to sell to Amazon prime members. Being able to sell to Amazon prime members is equivalent to a wider reach and larger audience outside of the regular customers on Amz.com
Regardless of the fulfillment model you choose, selling on AMZ involves several back-end processes like product research, keyword research, and listing optimization. And as a beginner who is just starting, you will need the best seller software to help you scale your business as soon as you create an Amazon business account.
At the end of the article, we’ll share with you the best Amazon seller software we recommend using. But first, what is an Amazon business account, and how do you start an Amazon business?
Related: Amazon FBA for beginners: 7 steps in order to start selling like a Pro.
What is an Amazon Business Account?
An Amazon business account is a dashboard through which entrepreneurs who wish to set up Amazon businesses can manage all their business needs. There are two types of Amazon business accounts: Vendor central and seller central. However, a vendor central account is an invitation-only business account. Seller Central, on the other hand, is a regular Amazon business account for third-party sellers.
Since the majority of sellers on Amazon are third-party sellers, our focus in this post will be on showing you how to become an Amazon seller through seller central. If you read to the end, you’ll learn how to create an Amazon business account, a seller central account to be precise.
How to start an Amazon business?
Selling on Amazon is not as complex as many aspiring sellers think. Some sellers assume that becoming a seller on Amazon is difficult because they struggle with setting up a seller account. As a result, “how to open an Amazon business account” is one of the most-asked questions from aspiring sellers.
So, how do you become a seller on Amazon? You’ll need to first set up an Amazon seller account. In the next section, we will show you how to open an Amazon business account in six simple steps.
How to Become an Amazon Seller: Amazon Seller Registration
The process is quite straightforward and should not be much stress if you follow this guide:
Visit Amazon’s website
This is obviously the first step of the process, so go to https://sell.amazon.com/ to get started.
Go to ‘See Pricing’
You will see this section when you scroll down the page and look to the right. Click on the ‘See Pricing’ button under the Make Money option. If you click the orange ‘Sign up’ button, you will be redirected to the registration page for professional sellers. In contrast, clicking on the ‘See pricing’ button will show the individual and professional account options, and you can select which registration you wish to use.

Choose between an individual or professional seller account
The website offers two seller plans: professional and individuals. A professional account is recommended if your selling rate exceeds 40 products per month. Although you may intend to sell as a hobby and not as a professional, you can still benefit from this plan as it can save you money. But when you only plan to sell a smaller number of units a month (i.e. less than 40), you should select the individual plan.

Click ‘ Create New account’ and provide the necessary details
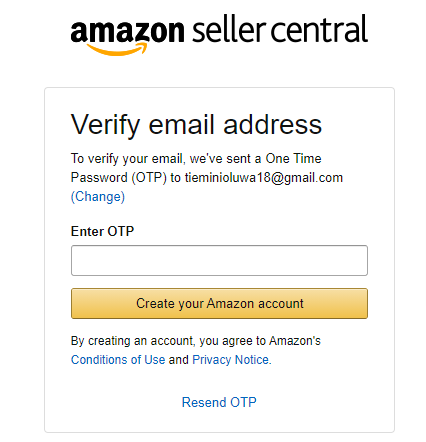
You will be prompted to enter your email address and a password for your seller account after choosing the seller plan. When you’re done, click the ‘Next button. Once you click the next button, you will be asked to fill in a one-time password (OTP) that was sent by AMZ to the email address you provided on the previous page.
The OTP serves as some sort of verification for your email address. Enter the OTP to verify Amazon account details. Then, Click on the ‘Create Amazon account” button.
Choose your ‘Business location’ and ‘Business type’
Next, the registration process requires that you provide the following information:
Business location: Here you indicate the country in which your business is located. Website personnel will verify this information, so it must be accurate.
Type of business: You may choose your entity from the following options:
- State-owned business
- Publicly-owned business
- Privately-owned business
- Charity
- None, I am an individual
Fill in your details
To allow you to continue, the website will request some personal details. You will be asked to provide a form of identification, which could be your driver’s license or passport number, depending on what works for you
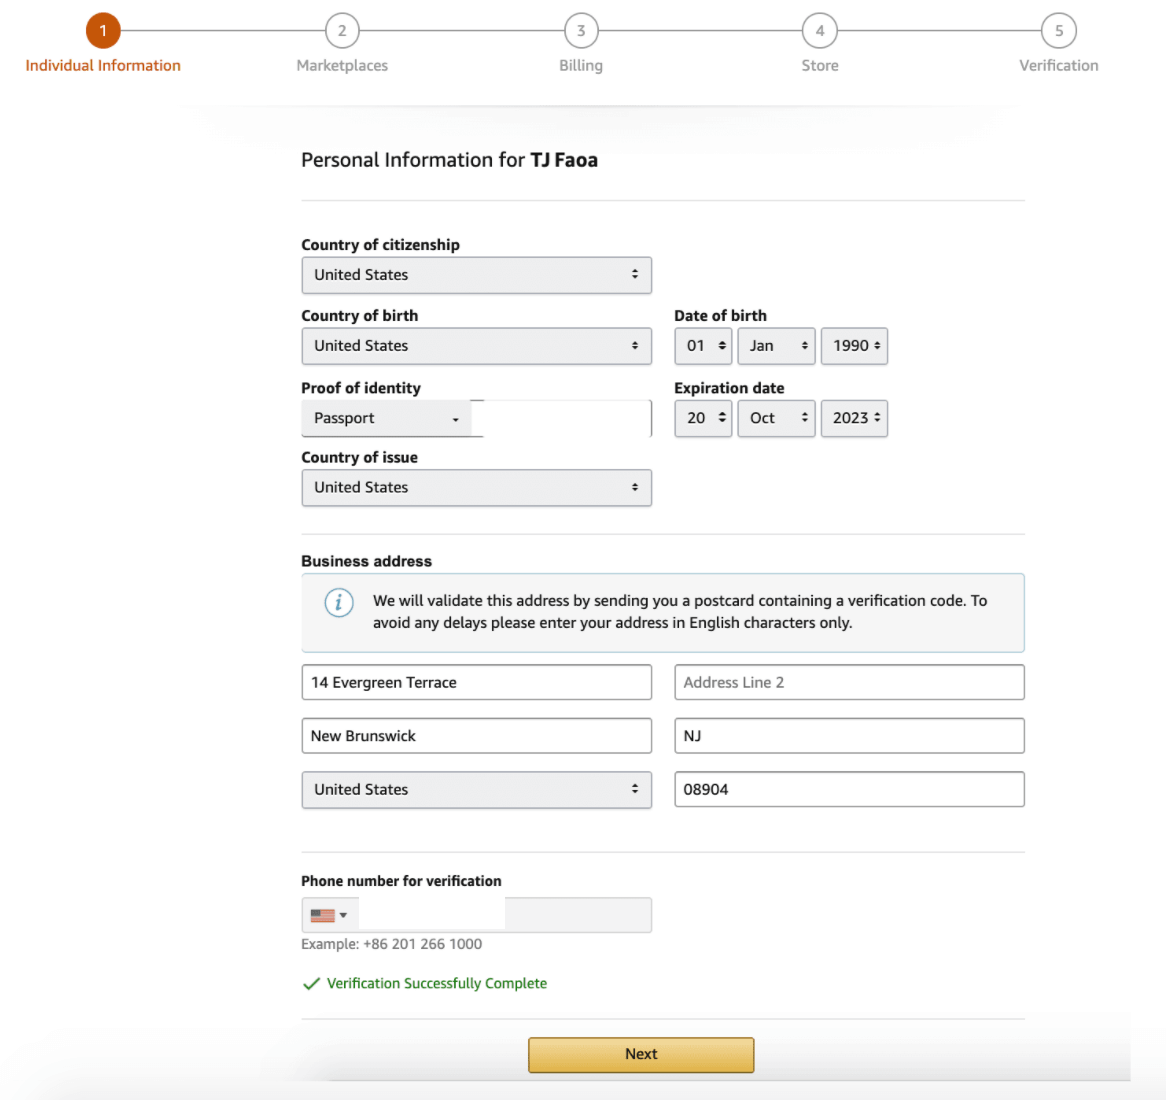
Click on the Next button after you have filled in all your details.
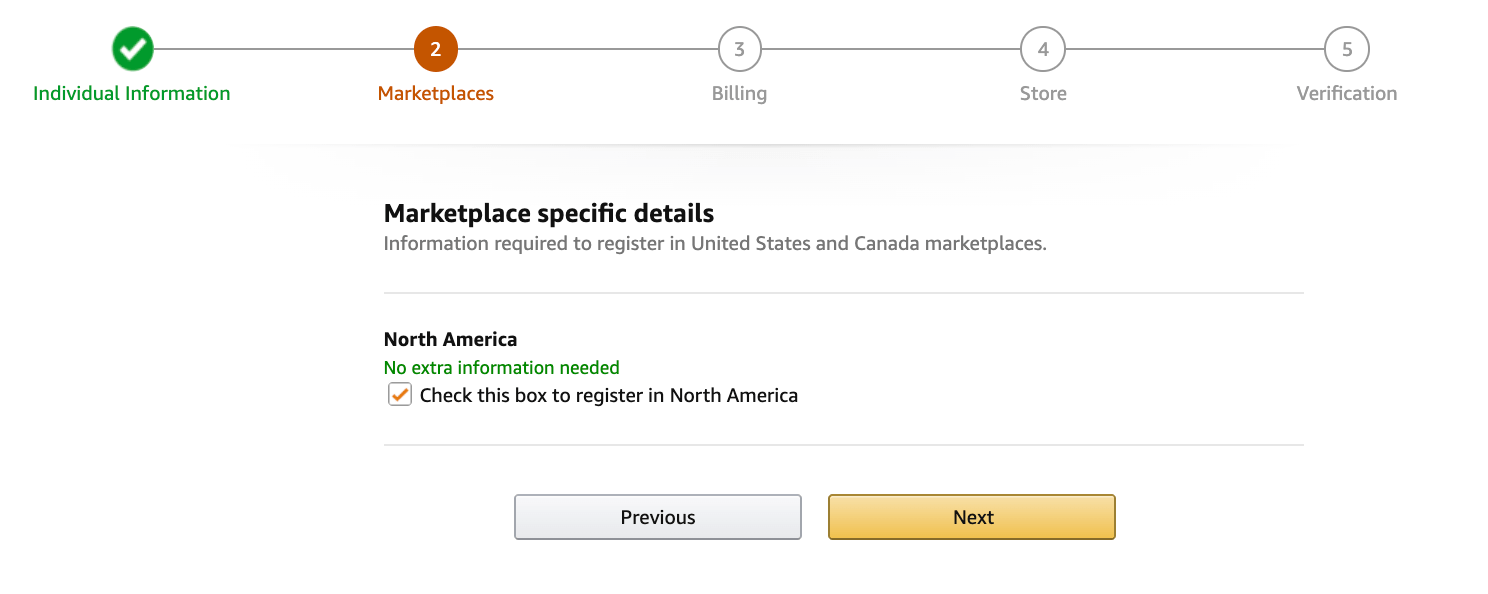
Choose your marketplace(s)
AMZ has several marketplaces, so once you are done on the previous page, you will have to choose which marketplace you want to sell (Example: Amazon.co.uk, etc.), and then click ‘next’.
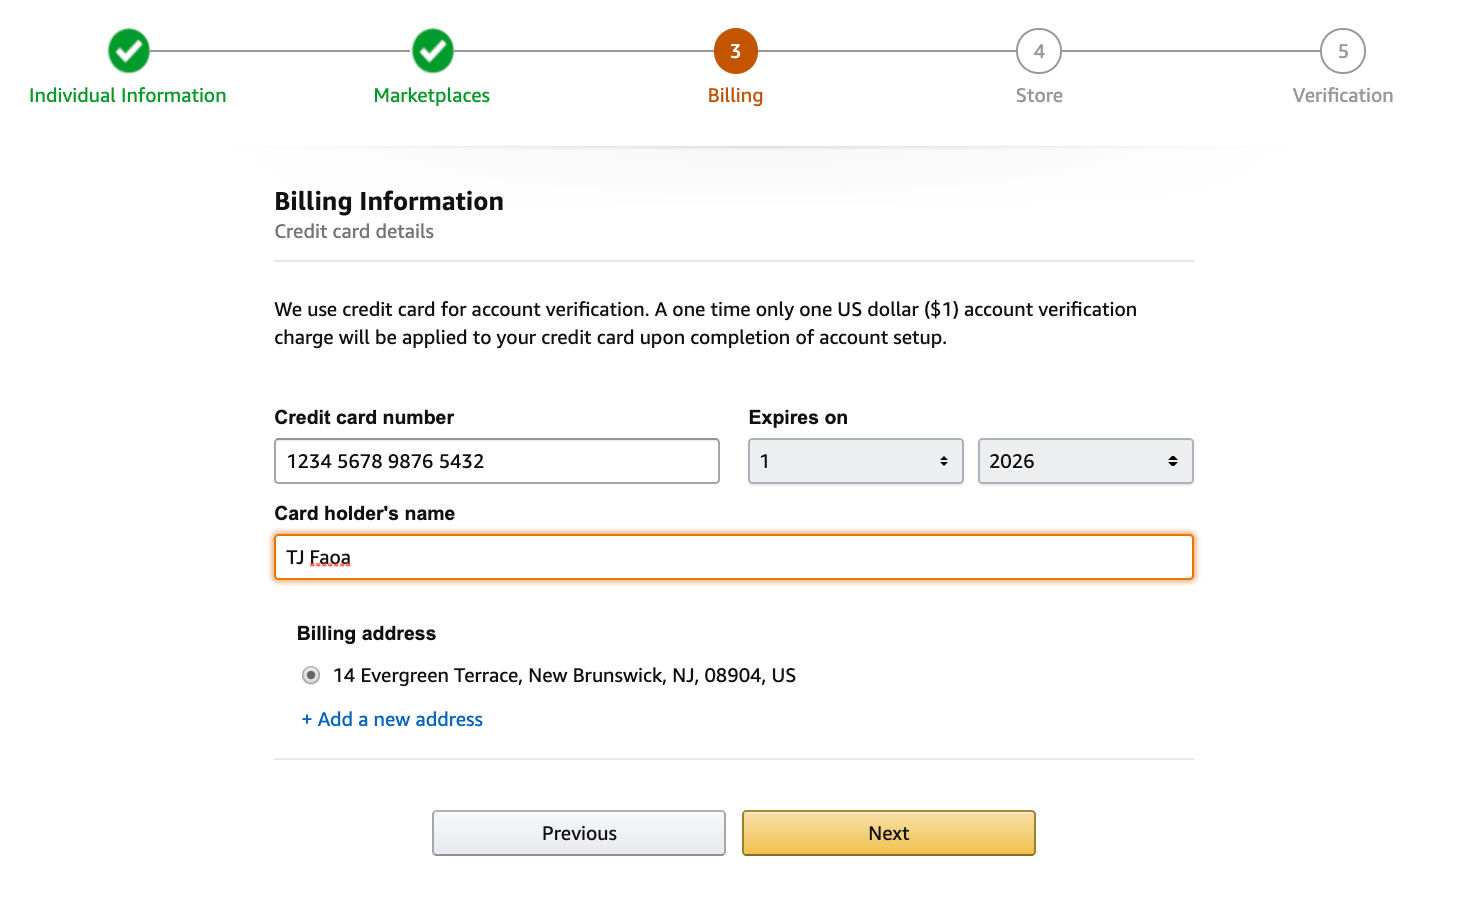
Provide Billing Information
Another way through which Amazon verifies your identity is to confirm that your credit card information is valid or correct. The next step after choosing your marketplace is to enter your credit card details (Name on the card, Number, and expiration date). To verify Amazon account details, always cross-check the information you have provided. After completing this, click Next.
Describe your product(s) and store
The next step is to provide your credit card information and verify it. There will then be questions regarding your store and the products you will be selling. The next step in the registration process is to answer the following questions:
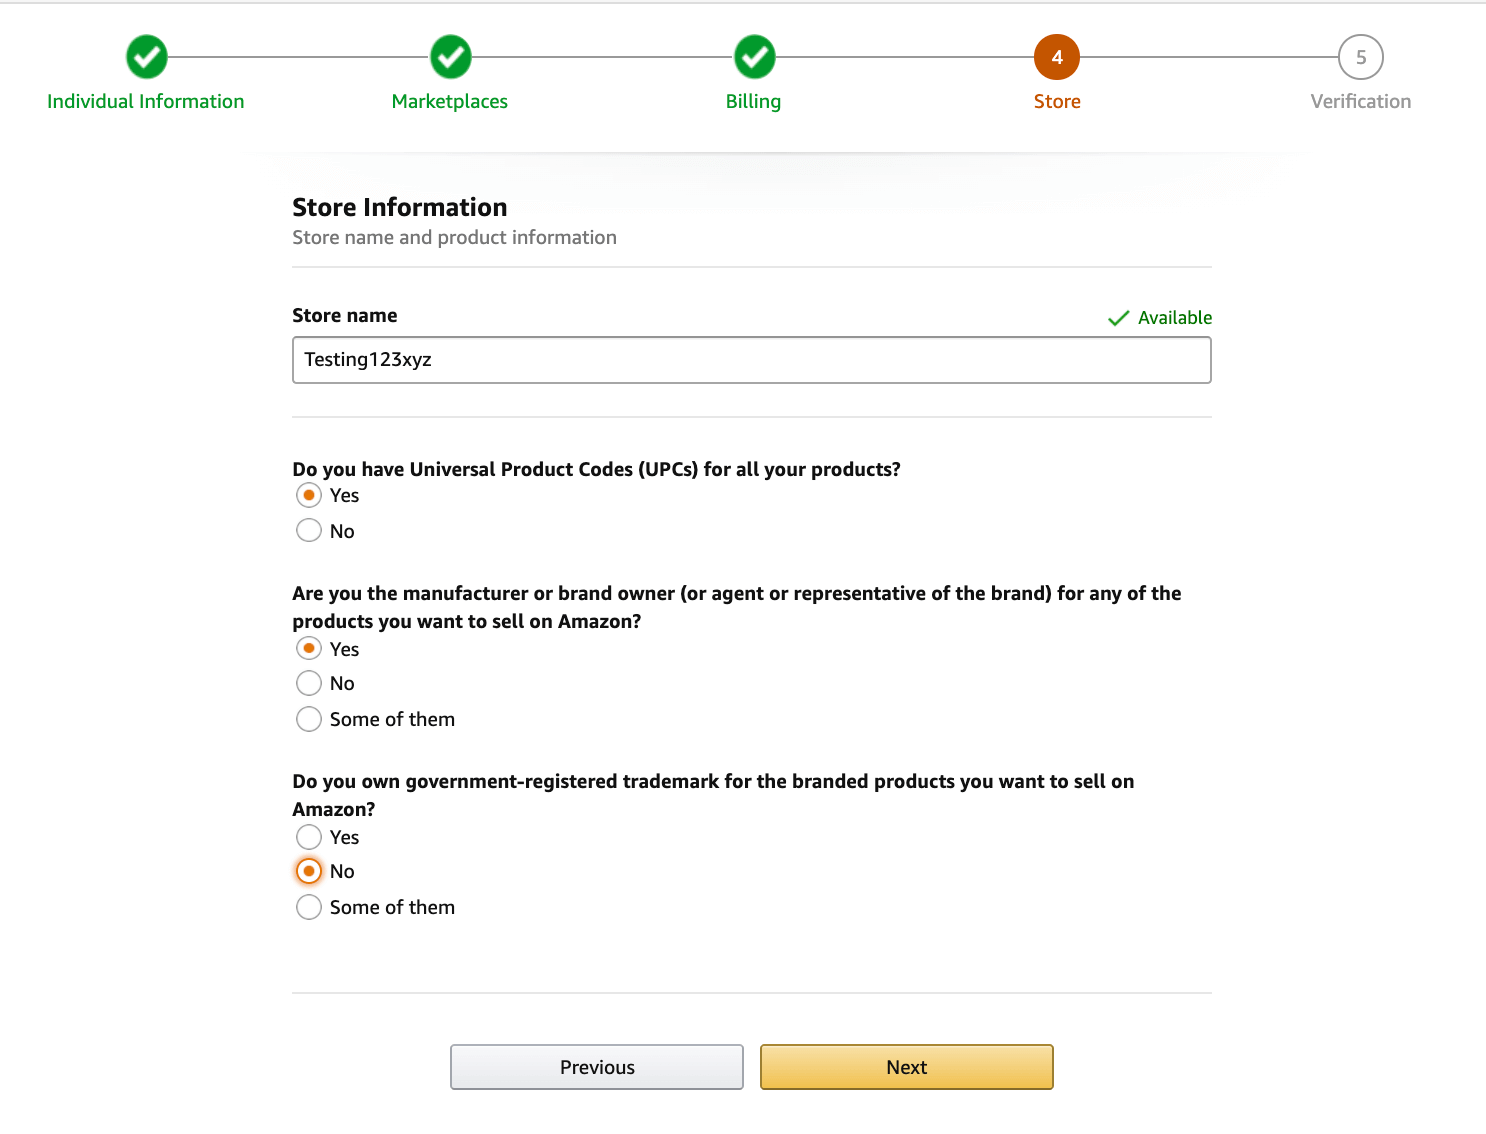
- Your store’s name
- Do you have a UPC for your product(s)
- Do you manufacture or own the brand of the product(s) you offer for sale
- Are your products trademarked? After you’ve answered each question, click ‘Next’.
Address Verification
The last step in the verify Amazon account details is to confirm the business address you provided in step six (the ‘Personal Information’ section).
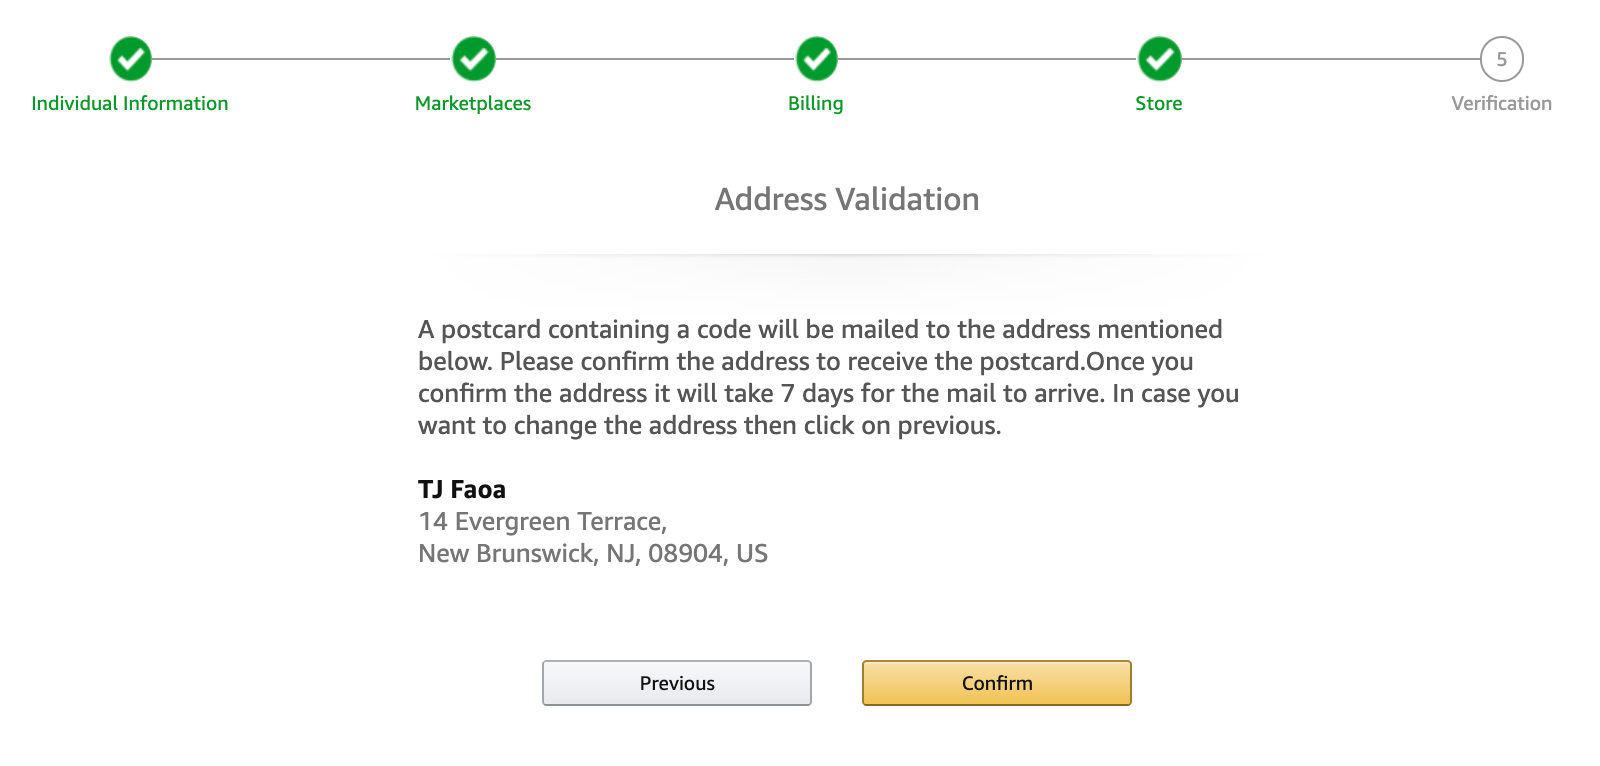
Once you click on the ‘Confirm’ button – provided the address displayed was correct, of course – you will see a new page. A postcard will be delivered to your address, along with a verification code. Once you receive the card, you must then enter the verification code into the field below ‘Enter code below and click ‘Next’ to complete the verification process.
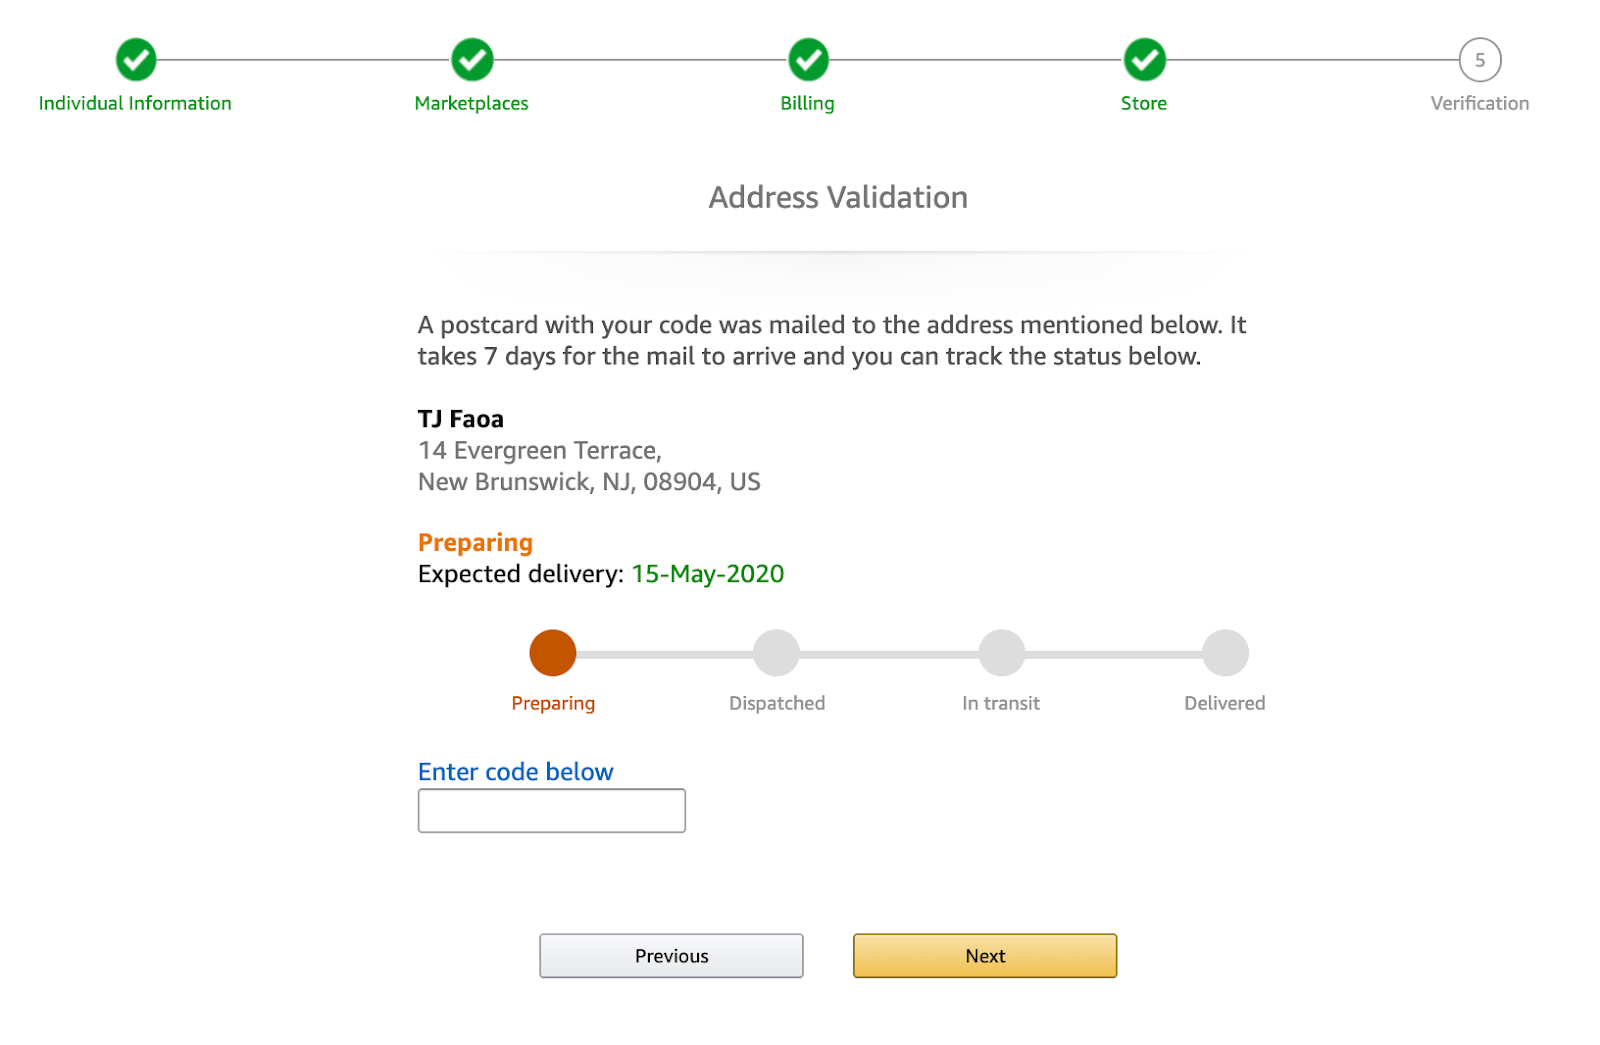
This is the last stage of setting up your Amazon seller account. You should set up two-factor authentication once you have created your Amazon seller account. After completing your registration, all you have to do for subsequent logins is to visit: https://sellercentral.amazon.com/ and click Log in.
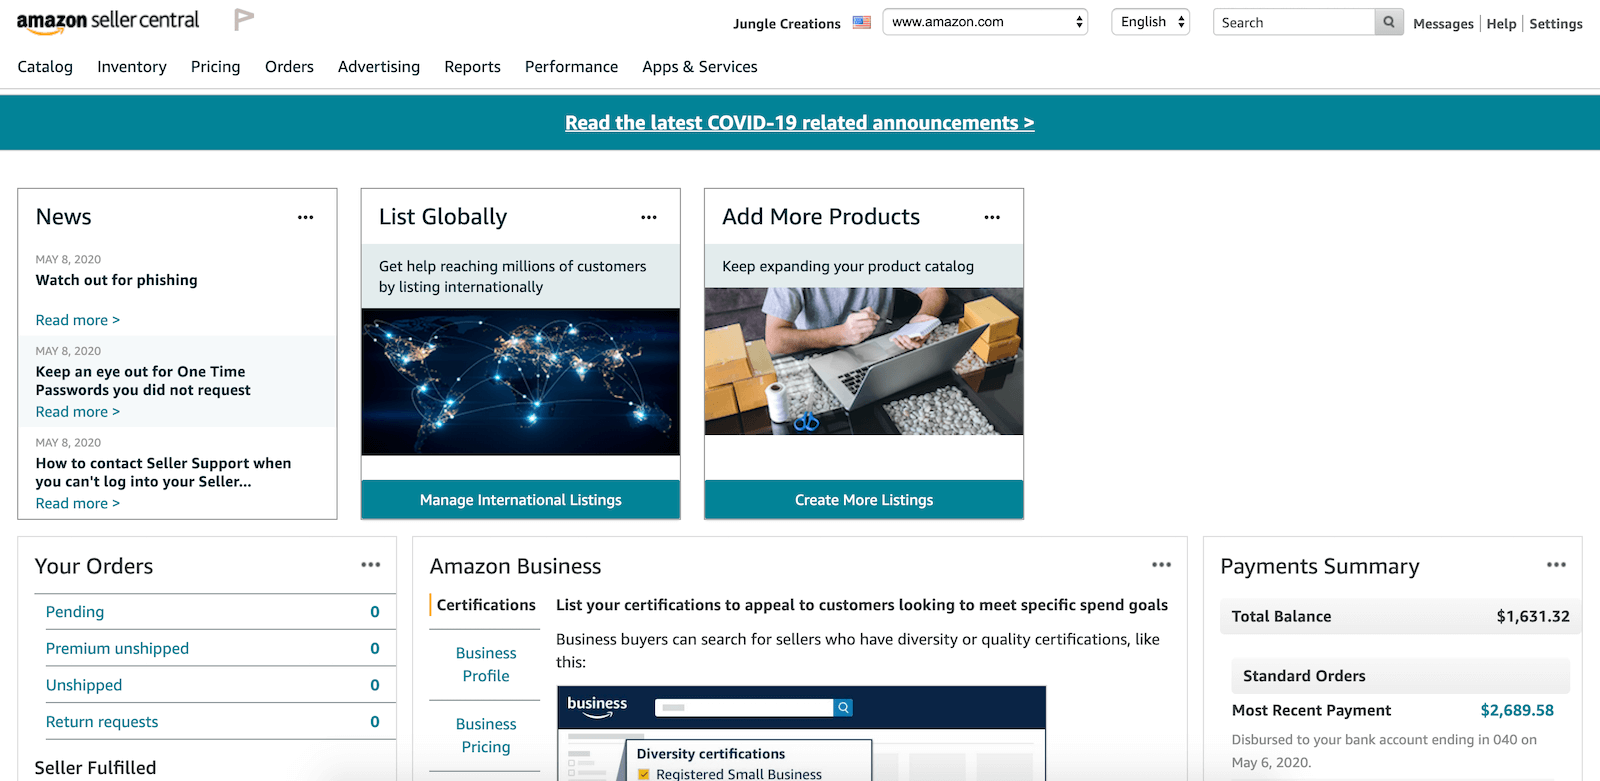
This is a comprehensive, yet simple overview of how to get an Amazon seller account created, and if you followed these steps, you must have set up an Amazon seller account by now. As a beginner, your home page will look like this if you have not made any sales.
Now that you know what it takes to become a seller on Amazon and how to get an Amazon seller account created, the next step is to be clear on the fees involved.
Looking for help to start selling on AMZ? Let us Help!

How To Build a Successful Amazon Business in 5 Steps
Anyone can become an Amazon seller, but it’s not always easy to build a successful Amazon business. And the good thing is that with Amazon, there is no one-size-fits-all rule. As soon as you start your Amazon business account setup, you can choose what products to sell and how you want your business to run. But at the end of the day, your success on the platform is largely dependent on the choices you make.
Decide how you want your business to run
This is the first step to starting a business. You should first figure out if you want to do wholesaling, private labeling, or even dropshipping. Would you rather be a wholesaler or use the online retail arbitrage approach? Will you be creating your own handmade products to sell on the website? Are you going to buy in bulk and resell the products for a profit? There are several options to choose from, but the first step to success is choosing what works best for you.
Choose your fulfillment method
As you already know, AMZ offers two seller options. The next thing to do after deciding how you want to run your business is to decide your fulfillment method. Many adjustments need to happen if you decide to go with the FBA or Fulfillment by Merchant option. You should carefully examine both methods to see which one works for your business. There are pros and cons for each, but they can both help you make more money if used well.
Choose products for your store
Even if you already have a product (for example, if you make handcrafted items), you should still go through this step. This is to verify that your product will have enough demand from customers. Becoming a successful seller depends largely on the products you choose to sell. If you are stuck with products that no one is interested in, then there is little to no chance of making sales, and that can be bad for you.
Your best bet is to use a product research tool like the Zon Research tool in ZonBase’s suite. Using this tool, you can search for the most profitable products in any category and uncover important product details to help you choose the best one. The tool also comes with filters to help you sift through your options and narrow down your search.
Explore the ZonResearch tool for free for 7 days
Start sourcing your products
Once your Amazon seller account has been approved, the next step is to source your products. Finding genuine suppliers to give you the best deals and quality products can be a herculean task. And this is an important task, so you should not handle it with levity. Amazon customers are eligible to file A-Z claims if your products are of low quality, and if you get too many claims, your seller account may be suspended.
With the ZonBase Hot Products tool, you can uncover profitable product options and get authentic supplier links to source them. This tool not only saves you time on product research, but it also saves you even more time on supplier research.
Explore the Hot Products tool for free for 7 days
Create your product listing
This is the final step to officially becoming a seller. Your product listings are the first and only way to get your products in front of potential buyers. If you create and optimize your listings well, you are more likely to make sales, so after finding a product, the next thing you should be focused on is optimizing your product listings.
Optimizing your product listings involves crafting catchy product titles, writing persuasive product descriptions, using relevant keywords, and using attractive product images. Creating well-optimized listings is not entirely easy, but with the right software, you can create and optimize your product listings in minutes.
ZonBase’s AI Listify tool allows you to create well-optimized product listings from scratch by giving a set of specifications. It is an AI-driven tool that allows you to enter a seed keyword, it then reviews your competitors’ listings and generates relevant keywords for your listings. Afterward, the tool will create a unique, well-optimized listing for your product from scratch.
What does it cost to sell on Amazon?
Selling on Amazon is a great idea, especially since there are different business models and you can make money on the platform from anywhere in the world. The flexibility that an Amazon business offers is great, but selling on Amazon comes at a cost. If you want to sell on the marketplace, you will have to incur Amazon seller fees.
Related: Selling Private Label Products on Amazon FBA
Amazon Seller Fees
The following are some of the fees that you might need to pay:
- The referral fee: This refers to the commission that AMZ takes from you for selling on their platform. The percentage varies from category to category but is usually between 8-40%. A referral fee of 15% is typically applied to most products.
- Selling plan fee: Amazon offers two selling plans; the individual and the professional selling plan. Your selling plan fee typically depends on the plan you choose. If you opt for the individual plan, you will have to pay $0.99 for every sale and if you opt for the professional plan, you will have to pay $39.99 every month. The individual plan is best for sellers who are not going into the marketplace fully and do not intend to sell more than 40 products every month. In contrast, the professional plan is best suited for sellers who intend to sell more than 40 products every month.
- FBA fees: Using the FBA program requires that you pay for fulfillment and inventory storage fees. These fees are usually higher for heavier and larger items, the fees go up.
- Miscellaneous fees: Additional fees sellers may have to pay additional fees including long-term inventory storage fees (for FBA), variable closing fees (for books, DVDs, etc), refund administration fees etc.
Amazon has an extensive list of all seller fees. Check out the updated list for 2024.

How to Scale your Business using FBA Software
Making money as a seller does not end with completing your registration. There are several other processes that you will have to carry out in other to scale your online business and start earning 6-8 figures monthly.
Some of these processes include: Product research, Keyword research, Creating product listings, and listing optimization. These processes are the backbone of every business and many beginners struggle with carrying them out manually.
Not only is the manual execution of these processes stressful, but it can also be time-consuming and complicated if you are just starting. This is where FBA software suites come into play.
Most FBA software is designed to help sellers carry out product research, and keyword research, create product listings, and optimize them. The goal is to save time, work less and earn more.
There are a plethora of FBA software options available, some of which are designed to carry out only one task while others can help with all your seller needs. However, the best seller software is one that houses all the tools you need to scale your business in one place.
You don’t have to worry about finding the best FBA software for your business, we have it right here!
What is the best Amazon FBA software?
From our experience, we can say that ZonBase is the best Amazon FBA software. This software is loaded with 13 tools to cater to all your seller needs in one place. ZonBase contains product search tools, keyword research tools, listing optimization tools, sales estimator, and photo enhancer.
If you are a beginner, you will find ZonBase’s combination of product search tools, keyword research tools, and listing tools very helpful.
ZonBase Product search tools include
- ZonResearch
- Zon Chrome Extension
- Hot Products
- Product validator
- Reverse ASIN.
- Its keyword tools are
- Zonbase Keywords
- Reverse ASIN
- Zon Tracker.
Your product listings are not left out either. Listify and Listing optimizer are available to take care of that. Getting the right keywords in your listing is very important when it comes to generating SEO traffic. People all over the world who are simply searching for content might end up landing on your listing. If you use the right keywords, you can get free traffic that you otherwise wouldn’t have.
Remember that you have to find genuine suppliers for your products? With ZonBase Hot Products, you can quickly find a list of trusted suppliers based on the results of your product search.
So all you have to do is to use the product search tools to find the winning products, and you can use the ZonBase hot products tool to find authentic suppliers and get the best deals. ZonBase also offers a profits tool that can help to track your spend visibility and manage your finances.
Using all of ZonBase’s seller tools will give you the results that you desire and you can be sure of scaling your business in no time.
Need Help Selling Products on Amazon? Sign up for a 7-day free trial
Conclusion
If you read to this point, then you already know how to get an Amazon account created. Now that you know how to get an Amazon account created and also complete your amazon seller registration, you will have to choose a fulfillment option.
It is not enough to know how to get an Amazon account created, you must also use a suitable fulfillment option and invest in software to ease your business processes.
Having learned how simple it is to go through registration and start your own successful business, don’t waste any more time.
4 Comments
Dear Sir /madam greetings I would love to sell on amazon but I only have a debit card I don’t have credit card I use my debit card to do every thing please tell me if I can join with my debit card…
If you have a debit card with a visa or mastercard symbol more then likely you can sign up on amazon with that.
In order to sell on Amazon you do need to have a valid credit card or debit card registered to your seller account. Your debit card must be associated with one of these major credit card companies: Visa, MasterCard, American Express, Discover, JCB, or Diner’s Club.
I don’t have debit card and credit card, Sir/Ma how can I apply to Amazon account?
In order to sell on Amazon you would need a valid debit or credit card. Your debit card must be associated with one of these major credit card companies: Visa, MasterCard, American Express, Discover, JCB, or Diner’s Club.