
Amazon is the largest online retail marketplace in the world, and that’s not surprising as the e-commerce platform offers many opportunities for its third-party sellers to grow. Its ever-increasing features and services are a testament to this. One of Amazon’s most recent features is the Amazon storefront feature for sellers.
Table of Contents
What is an Amazon Storefront?
The Amazon storefront is a new feature that AMZN offers sellers who want to create a customized shopping experience. With AMZN Stores, brands can now display all their products on a mini eCommerce website without the cost and dedication of building a website from scratch.
An optimized AMZN storefront can also serve as a landing page for advertisements. This works best if you want to showcase all your products at a glance. It is a smaller eCommerce website that caters to your brand and carries your products. Besides, the interface is typically beautiful and easy to navigate.
This new advertising feature is only available to brand-registered sellers. At first, when this feature was added, only vendors could use it. Now, third-party sellers who are brand-registered can take advantage of it. However, many sellers assume that using an Amazon store means selling to people outside of Amazon. No, it doesn’t. You can drive traffic to your storefront, but you still sell to AMZN’s customers through AMZN.
Are you interested in learning how to make an Amazon storefront in 2024? It will help if you read to the end. We’ll get to the part where you learn how to make an Amazon storefront. But first, what does it mean to be a brand-registered seller?
Who Is A Brand-Registered Seller?
Amazon brand registry is AMZN’s brand protection program, it helps AMZN identify brand owners and protect product content or intellectual property.
Furthermore, there is a team behind the brand registry program, and sellers can report intellectual theft, listing hijacking, and policy violations to this team. Sellers who sign up for the program and are approved by AMZN are known as “brand-registered sellers.”
These sellers have access to marketing services like A+ content and Amazon storefronts. Now that you know who brand-registered sellers are, how can you become one?
How To Sign Up for Brand Registry
- Go to the Amazon brand registry page to begin the process.
- Choose one of the 12 countries available. Afterward, you will be redirected to the AMZ marketplace for that country.
To sign up for the brand registry program, you’ll need to meet certain requirements. Here are the basic ones:
- Registered trademark that carries your brand name and matches your packaging.
- Must be able to verify yourself as the brand owner.
- Have an active seller central or vendor central account.
How to Set Up an Amazon Storefront: Requirements?
Creating an Amazon storefront is not difficult if you have the requirements. To set up an Amazon store, you must be a brand-registered seller. The requirements to become a brand-registered seller have been highlighted above.
Learn more about Amazon’s Brand Registry
Are you a brand-registered seller? Here’s how to set up an Amazon storefront in 7 simple steps.
How To Create Your Own Amazon Storefront: Step-by-Step Guide
Step 1: Create Your Amazon Store
Creating a storefront is not difficult at all. You can create your storefront in a few minutes by following the steps listed below.
- First, log in to your seller central or vendor central account.
- Click “Stores” on the dashboard
- Navigate to “Create Store”
- Next, choose your brand name from the pop-up
- Finally, click “Create Store” again.
If your brand name doesn’t pop up, confirm that you have been approved as a brand-registered seller. Only approved brands on Amazon will pop up when a storefront is being created.
Step 2: Enter Your Brand Name and Upload Your Logo
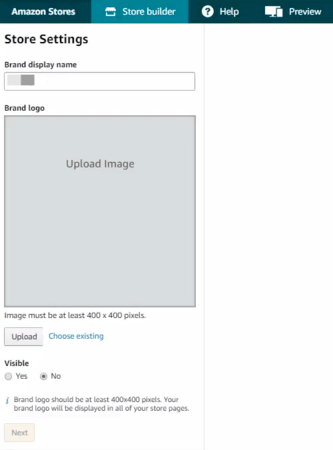
Upon completing the above steps, AMZ will take you to its store builder. Here, you will be required to enter your brand name and upload your logo.
Ensure your brand name is something that is closely related to your brand. Avoid using brand names that will confuse shoppers. Next, upload your logo as an image. The size requirement is about 400 x 400 pixels. You can decide to hide your logo, but it is best to make it visible to your audience.
Once you’re done filling in the required fields, click “Next”.
Step 3: Choose A Design or Template For Your Homepage
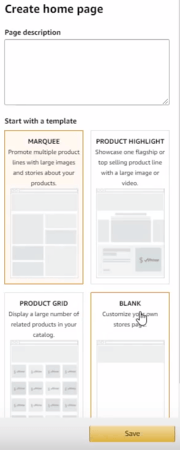
This may sound a bit technical, but it isn’t. There are some already-designed templates to choose from, which makes it easier. You can customize your layout by dragging and dropping designs or elements.
There are three homepage design templates.
- Marquee: Use bold images to draw attention to several products that your brand offers
- Product Grid: Here you can display all your products in a grid-like format
- Product Highlight: Focus on your bestsellers using an image or video
If you want to do your design, AMZ offers a blank template. You’ll also have to include a meta description, but keep it simple and concise. It should be something that captures the essence of your brand and products. After including your meta description and choosing a template, click “save”.
Step 4: Customize Your Store’s Design
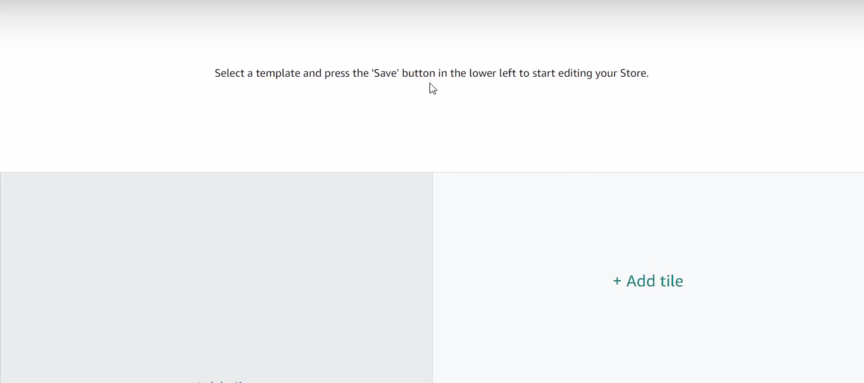
Here, you get to build your store to your taste and specifications. It is easy to do this since the storefront interface allows the drag-and-drop approach.
There are several tiles, and the way they’re arranged depends on the design you picked. Please select these tiles and customize them with any content (image, text, video). You can use links in these tiles if you want.
There’s also a preset box at the top of the page where your hero image will be. The hero image will be the most prominent image on your homepage. So, upload an image that is at least 3000 x 600 pixels. Ensure the photo reflects your brand and is related to the products you sell.
Step 5: Upload Your Products
You can upload products to your store using the tiles. First, you will have to upload products to your seller account. You can do this in bulk or individually. Uploading in bulk is easier and faster.
Here’s how to upload products on your seller central account.
- Log in to your account
- Click “inventory” on the dashboard
- Select “Add a product” or “Add products via upload”. The option you choose depends on if you want to upload in bulk or individually.
Next, go to your almost completed store and click “Product” when clicking on a tile. Afterward, you can search for your product using ASINs or keywords or click “search” and AMZ will load your listings.
If you want to add new products, hold a tile and click “add”. Click the tile and select “Replace product” if you want to replace a product. When you add a product to a tile, it will display your product’s image and price.
Step 6: Add More Pages and Subcategories
This will help shoppers find your products easily and increase your conversions. Moreover, adding product images is a great way to customize your storefront further.
It is advisable to always use new, high-quality photos and infographics for your Amazon Storefront. Be open to switching things up to attract customers and provide them additional visual information about your products. Try not to use the same images that are on your listing page.
You can also include mini pages within your main categories. These mini pages can be used to display text, video, listing previews, or product photos. Select your preferred tile type by clicking on one of the empty tiles on your home page to add a new section. Also, link your image tiles to product listings. This makes purchase easy for buyers as they can simply click on an image to go to the product shown there.
To add more pages, follow these steps:
- Click “Add page” in the store builder main menu
- Add your page title, this will show on your store navigation menu
- Add a meta description to tell customers what your store is about
- Choose a layout template (Marquee, Product highlight, and Product Grid).
Step 7: Preview and Launch Your Store
Before launching your store, ensure you preview it. Click “Preview” in the navigation bar. Previewing shows you what your storefront looks like and how everything works. If you notice any bugs, you can fix them before launching. You can also seek third-party opinions and implement any feedback you get.
If you’re satisfied with the results you get, go ahead and launch your store. Before launching your store, be sure to look out for the following:
- Grammatical and typographical errors
- Differences in brand and image details
- Navigation bugs
To launch, click “submit for publishing” and wait for AMZ’s approval. AMZ’s approval typically takes about 24 hours. Be on the lookout for any glitches and notifications so that you can fix them.
Having gone through a breakdown of the steps involved in creating a storefront, why should you use one?
Related: Complete seller central guide
Benefits of an Amazon Storefront
- Brand-Specific Marketplace
Stores allow you to display your bestselling products without competition. Customers will not have to carry out individual searches. Instead, they can browse through your product catalog in one fell swoop. You’ll also have your customized address, for instance, Amazon.com/YourBrandName.
- More Room To Explore Your Creative Abilities
You can use as many videos, graphics, and images as possible. With AMZ stores, there’s no limit to how far you can unleash your creative potential. You take the initiative and customize your brand outlook until you’re satisfied.
- No Competition
Since AMZ storefronts are brand-specific, only your brand will be on display. Many brands are selling products on the main marketplace, and the competition is stiff. However, you will not have to struggle with other brands with a storefront. These stores take customers away from all the distractions on the main website. As a result, they will make decisions quickly, and in the long run, this will increase your conversions.
- Show Your Customers Where To Go
Instead of leaving your potential buyers roaming on the streets of AMZ, you can show them where to go. With sponsored ads, you can drive traffic to your storefront. You can also drive traffic or retarget audiences from other channels like email lists and social media.
- Create Several Pages and Categories
Your store displays only your products. So you can create different categories for your items. If you sell shoes, you can section them further into children’s shoes, women’s shoes, and others.
- Easy Way To Understand Customer Buying Patterns
Using the store insights tool, you can see how much traffic your store gets and how many sales you’re making. You can also see what decisions shoppers are making. This will help you decide whether your advertising strategies are working and help you make changes where necessary.
What Metrics Can You See Through The Store Insights Tool?
- Traffic in-flow: You can track the number of visitors that viewed your store per day.
- Views: This shows you the number of people that viewed a page per day. It also includes repeated views.
- Unique views: This shows the unique pages viewed by a visitor daily.
- Sales: Here you can track the total sale you made from your visitors within 14 days of their last visit to your store.
- Purchased units: This shows the total units that these visitors bought within 14 days of their last visit.
How to Drive Traffic to Your Amazon Storefront
One of the reasons for setting up your storefront is to increase your conversions and boost sales, but you can only do this by driving traffic to your storefront and getting more eyes on your products.
Driving traffic to your storefront is not difficult at all, you can generate more traffic from Amazon or off-Amazon.
The most popular way to gain more traffic on Amazon is when shoppers click on your sponsored brand ad. Apart from this, you can also leverage off-Amazon marketing channels to drive traffic to your storefront. This includes creating social media campaigns, email campaigns and even using advertisement campaigns.
Other Helpful tips to Setup an Amazon Storefront
Incorporating A+ Content into Your Amazon Storefront:
- Select Relevant Products: Choose the products you want to feature in your Amazon storefront and decide which ones would benefit the most from additional details and visual storytelling.
- Access A+ Content Manager: Log in to your Amazon Seller Central account and navigate to the A+ Content Manager section. Select the products you wish to enhance with A+ Content.
- Choose a Layout: Amazon provides several layout options for A+ Content, such as Comparison, Standard, and Spotlight. Choose a layout that best suits your brand and the type of information you want to convey.
- Design Engaging Modules: Create compelling modules using images, videos, charts, and graphics. Each module should serve a purpose, whether it’s highlighting features, demonstrating use cases, or providing testimonials.
- Tell Your Brand Story: Use A+ Content as an opportunity to convey your brand’s story, values, and unique selling points. Incorporate elements that resonate with your target audience and differentiate your brand from competitors.
- Provide Clear Product Information: Break down technical details, specifications, and benefits in a clear and concise manner. Use bullet points, headers, and visuals to make the information easy to digest.
- Include Calls to Action: Guide customers toward the next steps by incorporating calls to action. Encourage them to explore related products, learn more about your brand, or make a purchase.
- Review and Publish: Take the time to review your A+ Content for accuracy, consistency, and alignment with your brand identity. Once you’re satisfied, submit the content for approval.
A+ Content is a valuable tool that can transform your Amazon storefront into a captivating and informative shopping destination. By incorporating A+ Content, you not only provide customers with a more comprehensive understanding of your products but also create a memorable and delightful shopping journey. Elevate your brand’s presence on Amazon by leveraging A+ Content to showcase your products in a way that resonates with your target audience and enhances the overall customer experience.
Engaging Customers with Interactive Content: Quizzes, Polls, and More

Let’s dive into the world of interactive content and explore how integrating elements like quizzes, polls, and interactive images can transform your Amazon storefront into an interactive playground, fostering deeper connections and driving conversions.
Why Interactive Content Matters:
Interactive content goes beyond static images and text, creating a two-way communication channel between you and your customers. It stimulates curiosity, elicits responses, and invites active participation, resulting in a more memorable and enjoyable shopping experience.
1. Quizzes: Uncover Personal Preferences and Needs: Quizzes are an excellent way to help customers discover products that align with their preferences and needs. Consider creating quizzes that guide customers to the most suitable product based on their style, preferences, or specific requirements. For instance, a skincare brand could offer a quiz to determine the ideal skincare routine based on individual skin types. Not only does this provide valuable guidance, but it also keeps customers engaged and intrigued by the personalized experience.
2. Polls: Empower Customer Decision-Making: Polls give customers a voice and allow them to actively participate in shaping their shopping journey. Use polls to gather insights about customer preferences, upcoming product releases, or even to decide which products to showcase prominently in your storefront. By involving customers in the decision-making process, you create a sense of ownership and community, fostering a deeper connection with your brand.
3. Interactive Images: Show, Don’t Just Tell: Interactive images offer a dynamic way to showcase your products. Implement zoom-in features, 360-degree views, or before-and-after sliders to provide a more comprehensive understanding of your offerings. Customers can explore intricate details, visualize product usage, and gain a better sense of size and dimensions. This level of engagement not only enhances their understanding but also reduces uncertainty and increases confidence in their purchase decisions.
4. Interactive Tutorials and Demonstrations: Educate and Delight: Use interactive content to educate customers on how to use your products effectively. Create step-by-step tutorials, interactive guides, or video demonstrations that walk customers through the benefits and features of your products. This not only showcases your expertise but also ensures customers feel confident about their purchase and know how to make the most of it.
FAQs
Who Can Set Up An Amazon Storefront?
The first criteria for anyone who wants to set up a store are to be brand-registered. Third-party sellers, vendors, and agencies can use this feature.
How Much Does It Cost To Make A Store?
Creating a storefront is free, so you won’t have to pay any extra fees. But, the majority of people who use this feature use the professional selling plan. The plan costs about $39.99 monthly.
Get The Best Results From Your Store With ZonBase
Building an AMZ store can increase your chances of success on Amazon. But if you do not do it the right way, you still won’t get the desired results.
A lot goes into creating an Amazon storefront, so it’s only fair for your results to match your work. Creating and optimizing your listings is a major aspect of managing a store. You will have to create product listings before adding products to your store. But you do not have to create and optimize listings manually if you don’t want to.
ZonBase is an all-inclusive AMZ software for sellers who want to scale their businesses. With ZonBase, you can create your listings using relevant keywords, titles, and descriptions. Apart from listing optimization, the software also offers a photo enhancer.
Pictures play a major role in attracting customers to your store. So your product images have to be sharp and captivating. The photo enhancer allows you to outsource all your photo editing needs to a team of experts. This will come in handy if you have a ton of images with bad backgrounds; the photo enhancer takes your images from 0 to 100 in a little time.
ZonBase’s PPC tools are also the best if your goal is to improve your ranking and ad conversions.